
In our blog posts Reducing Infrustration and Immutable Demo Nodes, we talk about our approach to immutable infrastructure and the benefits we have seen from employing this approach. In this article, we explore a practical project example so you can get up and running with immutable infrastructure in less than an hour!
Overview
Ansible is incredibly powerful and features a whole lot of tools for manipulating AWS (Amazon Web Services) infrastructure.
We're going to start with the simplest project that we can; let's assume you have an application that you want to deploy onto immutable EC2 nodes. Your app could be anything - PHP, Python, Ruby, NodeJS - it doesn't matter!
We are going to work through an example, step-by-step, to show you how it could be done in a simple way in Ansible.
Order of events
Here's what we're aiming for. It's a simple method for immutable infrastructure which is based on adding nodes to the load balancer, then destroying all the old nodes.
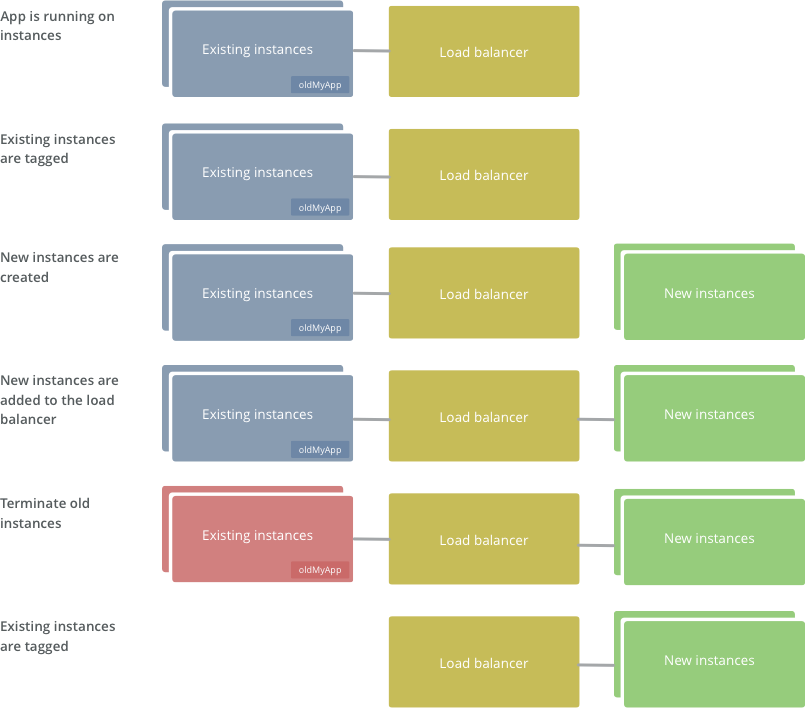
- Tag any running instances of your project (if there are any) with oldMyApp=True
- Provision new instance(s)
- Add new instance(s) to the load balancer
- Destroy the nodes you tagged with "oldMyApp=True"
This has the following advantages:
- If it fails at any point, the load balancer keeps running with its existing nodes - no downtime!
- ...and any nodes that's didn't provision correctly will automatically be removed on the next run
- It's super simple!
Step 1: Setting up AWS
Before we get started, we are going to do a few setup tasks to get our infrastructure ready.
- Create a security group, e.g.
sg_myapp- see Amazon's docs - Create a load balancer, e.g.
lb-myapp- see Amazon's docs - A domain in route53 - see Amazon's docs
Step 2: Create a directory for your Ansible playbook
Pretty much any structure will work. Let's go with:
/ansible - our playbook
/yourapp - your application
Step 3: Dynamic inventory
We use dynamic inventory so that Ansible can work out what nodes we have in AWS. So, in directory /ansible/inventory, put the ec2.ini and ec2.py files from the dynamic inventory.
Create /ansible/ansible.cfg for configuring Ansible to use the dynamic inventory. We suggest:
[defaults]
ansible_managed = Ansible managed: {file} modified on %Y-%m-%d %H:%M:%S by {uid} on {host}
hostfile = inventory/ec2.py
remote_user = ubuntu
[ssh_connection]
pipelining = True
ssh_args = -o ControlMaster=auto -o ControlPersist=30m -o StrictHostKeyChecking=no
control_path = /tmp/ansible-ssh-%%h-%%p-%%r
Step 4: Amazon access key and secret key
Also create /inventory/aws_keys. This is a file that will simply include your security information so that Ansible can communicate with Amazon Web Services.
This file should contain information like the following. Your specific values will vary. Amazon's documentation tells you how to get these values.
export AWS_ACCESS_KEY_ID='HJFLKJ32T32TGEKJG3'
export AWS_SECRET_ACCESS_KEY='HJFLKJ32T32TGEKJG3HJFLKJ32T32TGEKJG3'
export EC2_REGION='us-east-1'
Also, export the .pem from AWS and put it in /ansible/myapp.pem - follow Amazon's documentation on EC2 keypairs. This key will be used by Ansible to set your SSH credentials so that it can talk to AWS.
Step 5: any specific roles your playbook may need
We will have a directory /ansible/roles. These are the roles that install your application. This is out of scope of this article as it will depend on your application.
Step 6: create playbook to tag the old nodes
Create /ansible/tag-old-nodes.yaml
---
- hosts: all
  gather_facts: false
  sudo: no
  tasks:
  - name: Get instance ec2 facts
    action: ec2_facts
    register: ec2_facts
  - name: Add a tag "oldMyApp" to all existing nodes, so we can filter them out later
    local_action: ec2_tag resource={{ec2_facts.ansible_facts.ansible_ec2_instance_id}} region='us-east-1' state=present
    args:
      tags:
        oldMyApp: true
All this does is, using the dynamic inventory, goes through the existing nodes and adds the tag "oldMyApp" (set this tag to something more relevant to your app).
Step 7: add playbook to stand up nodes
Create /ansible/immutable.yaml. Read our comments carefully, please don't simply copy/paste this!
---
- hosts: localhost
  connection: local
  gather_facts: false
  vars:
    instance_type: 't2.micro'
    region: 'us-east-1'
    aws_zone: 'b'
  tasks:
  - name: Launch instance (Ubuntu 14.04 hvm)
    ec2: image='ami-9eaa1cf6'
         instance_type="{{ instance_type }}"
         keypair='myapp'
         instance_tags='{"Environment":"myapp","Class":"myapp-immutable","Name":"myapp (immutable)"}'
         region='{{region}}'
         aws_zone='{{ region }}{{ aws_zone }}'
         group='sg_myapp'
         wait=true
    register: ec2_info

  - add_host: hostname={{ item.public_ip }} groupname="myapp,ec2hosts"
    with_items: ec2_info.instances

  - name: Wait for instances to listen on port 22
    wait_for:
      state=started
      host={{ item.public_dns_name }}
      port=22
    with_items: ec2_info.instances

# Run your specific roles that install and configure your application
- hosts: ec2hosts
  gather_facts: true
  user: ubuntu
  sudo: yes
  roles:
    - myapp

- hosts: ec2hosts
  tasks:
  - name: Gather ec2 facts
    ec2_facts:
  - debug: var=ansible_ec2_instance_id # You can remove this if you like
  - name: Add newly created instance to elb
    local_action:
        module: ec2_elb
        region: 'us-east-1'
        instance_id: "{{ ansible_ec2_instance_id }}"
        ec2_elbs: "lb-myapp"
        state: present
Step 8: add playbook to destroy old nodes
Create /ansible/destroy-old-nodes.yaml
---
- name: terminate old instances
  hosts: all
  tasks:
    - action: ec2_facts
    - name: terminating old instances
      local_action:
        module: ec2
        state: 'absent'
        region: 'us-east-1'
        keypair: 'myapp'
        instance_ids: "{{ ansible_ec2_instance_id }}"
All this does is remove any instance that has the tag "oldMyApp". This tag is actually passed in from the kick off script.
Kick off script
Create /ansible/provision.sh:
#!/bin/bash

set -u # Variables must be explicit
set -e # If any command fails, fail the whole thing
set -o pipefail

# Make sure SSH knows to use the correct pem
ssh-add myapp.pem
ssh-add -l
# Load the AWS keys
. ./inventory/aws_keys

# Tag any existing myapp instances as being old
ansible-playbook tag-old-nodes.yaml --limit tag_Environment_myapp

# Start a new instance
ansible-playbook immutable.yaml -vv

# Now terminate any instances with tag "old"
ansible-playbook destroy-old-nodes.yaml --limit tag_oldmyapp_True
Make sure provision.sh is executable (e.g. chmod u+x provision.sh). Now, all you have to do, to totally refresh your infrastructure with brand new provisioned nodes, is run:
./provision.sh
Is this a good approach?
This is a solid starting point that we use for lots of small projects. It works just great for us for these projects. With more complex projects, we use more sophisticated approaches.
Larger projects may wish for something more full-featured, for example, creating a new load balancer, running tests, before switching over Route 53.
Wrapping up
This is just one quick-and-easy way of getting started with immutable infrastructure. We hope that it's given you some confidence to start deploying immutable infrastructure of your own!
Related articles
- Immutable Demo Nodes - how Radify adopted immutable infrastructure and what the benefits have been.
- Four Principles of DevOps - the principles we apply to our infrastructure and operations.
- Reducing Infrustration - we adopted an immutable infrastructure approach for our web and API nodes. We talk about what it is, why we did it, and what the costs and benefits have been.
