This e-book was originally published in 2015 by Five Simple Steps. Five Simple Steps have closed their online store and graciously returned the rights to the authors, so we are offering this book for free.
Introduction
This book is aimed at designers who also do front end development. These days, it seems that we all wear multiple hats in our jobs!
Since the turn of the century, web development has become far more sophisticated. This has led to more complexity, and many of us are finding we have to work with many new things. This can seem a little intimidating (I have certainly found myself wishing that the pace of progress would slow down!).
To take advantage of this sophistication whilst reducing its complexity, front-end developers use build tools. These tools allow us to work at a higher level and automate away repetitive tasks, thereby saving time and producing more sophisticated results. Automation streamlines our processes so that we can focus on creative work, rather than spending hours lost in the weeds of tedious tasks.
In this short book, we will go through some of the build tools that are available, what they can do for you, and how you can get started with them. I will refer to some specific tools, but this book will not teach you the specifics of a particular build tool; after all, each build tool is well documented online and in print already. Instead, this book functions as a primer on what build tools are and how to assemble powerful, efficient build workflows with them.
The goal of this book is that, once you have read it, you will be able to improve your workflow by incorporating build tools. I aim to give you the confidence and knowledge needed to dive into this world of powerful and flexible utilities, become more productive, and enjoy your work more as a result.
Let’s talk about workflow
Workflow is the set of tasks that one goes through when doing a job. Everyone’s workflow is different, and you might have multiple workflows for different aspects of your role. We will look at web development workflow and how to optimise it.
Basic web development workflow
In developing websites and applications, you probably have phases that look something like this:
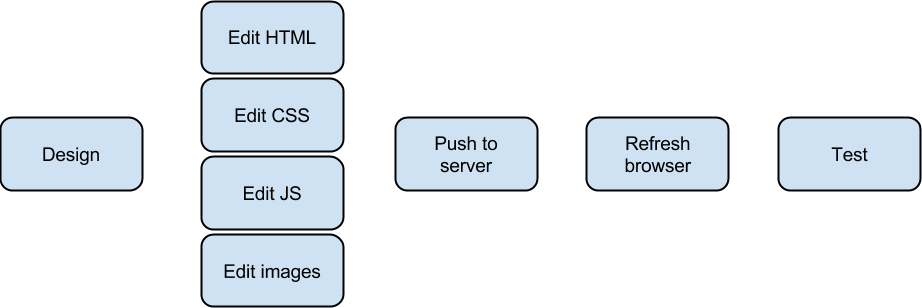
Don’t worry if your workflow is different. I’ve just selected a number of common tasks; the principles found in book will apply no matter what your workflow is.
There are a number of problems with this common, simplistic workflow:
- File size - there is no minification of the assets or compression of the images, so the application will perform slower than it ought.
- Consistency - pushing to a server can be error prone: assets may be cached, transfers can fail, etc.
- Speed of workflow - pushing and refreshing manually is time consuming and takes you out of the "zone" of your workflow.
Let’s add a few more tasks to this workflow to address these issues.
Creating an asset pipeline
To resolve the problems we have identified in the basic workflow, we can incorporate compression, minification, and concatenation. Minification compresses code without changing its functionality. Concatenation combines multiple files together into a single file, improving download speeds. Let’s add these tasks to the process:

This approach, commonly known as the asset pipeline, takes assets from an input area, transforms them, and delivers them to an output area. We will look at how to structure and automate an asset pipeline.
A common convention is to have two separate directories in the root (top level) of your project. The first is src, which contains source code - the files you edit. The second is build, which contains files that are generated and delivered to the end user. You never edit anything in build directly. The project’s specific location is not important, but this book assumes that the project is saved in /home/user/myproject on OSX/Linux or C:\Users\user\myproject on Windows.
In some projects,
buildmay be calleddist, which is short for "distribution".
| Directory | OSX/Linux | Windows |
|---|---|---|
| Source | /home/user/myproject/src | C:\Users\user\myproject\src |
| Build | /home/user/myproject/build | C:\Users\user\myproject\build |
Once build and src are separated, move any existing project files into the src directory. These are the files that you will edit. Everything in build will be generated using your build tool - we never edit files in build directly. Hands off!
It’s best to test something that’s as representative as possible of what the end-user will receive. Therefore, it’s a good practice to test in
build, not insrc, so as to catch any potential problems that the transformations might have introduced.
A full treatment of SCM (Software Configuration Management) is outside the scope of this book, but I will make one suggestion: when using a version control tool like Git, Mercurial, or Subversion, add the build directory to your SCM’s ignore file. You do not want to commit anything in build - it’s considered volatile. In SCM, only the source files are committed to your SCM, and these generate the build. This keeps commit logs clean and uncluttered by the build assets.
To learn about Git, check out Version Control with Git by Ryan Taylor
Here is how the asset pipeline might look:
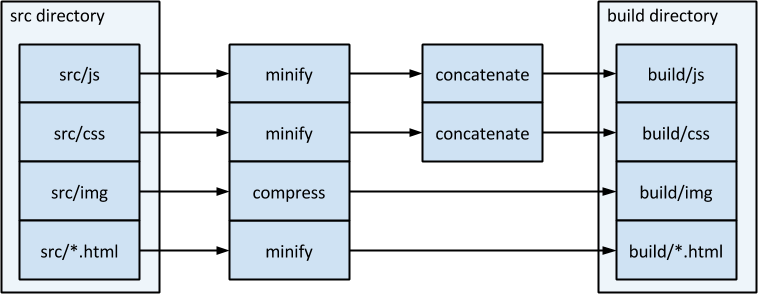
Assuming that you have two javascript files, src/js/a.js and src/js/b.js, and two CSS files, src/css/first.css and src/css/second.css, the build would output build/js/all.min.js and build/css/all.min.css:
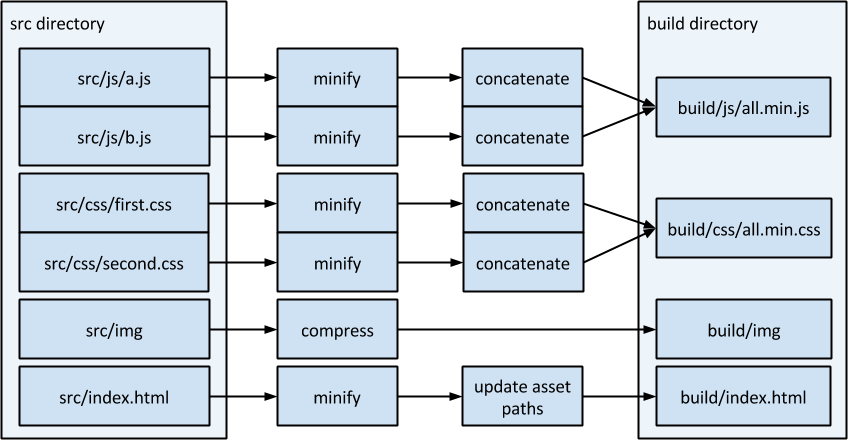
Because we have concatenated multiple assets into single files, we will have to replace the references to the assets. In src/index.html, we have four such references:
<head>
  <script src="/js/a.js"></script>
  <script src="/js/b.js"></script>
  <link rel="stylesheet" media="all" href="/css/first.css">
  <link rel="stylesheet" media="all" href="/css/second.css">
</head>
In build/index.html, this becomes just two references:
<head><script src="/js/all.min.js"></script><link rel="stylesheet" media="all" href="/css/all.min.css"></head>
At this point, the minified and concatenated assets, bundled up cleanly in the build directory, are ready to be pushed to the server. There are some problems, though:
- Isn’t this process unnecessarily complex?
- How do we know if there are problems with the code?
- How do we manage this process?
Here is where we introduce the wonderful world of build tools!
Automated workflows with build tools
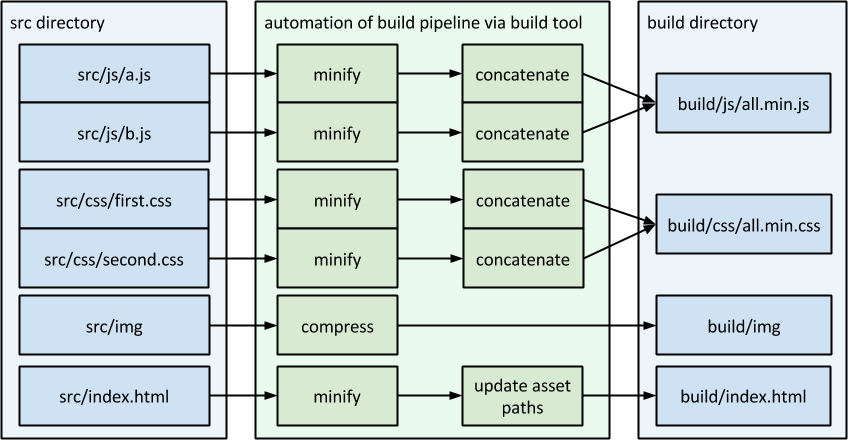
A build tool is software that automates the transformation of source code into a deliverable. Any time a change is made to the source code, the build tool should be run - usually from the command line. The build tool is how we implement asset pipelines:
Available build tools
There are many build tools available. This book focuses on the web and therefore looks at those tailored to HTML, CSS, and JavaScript. Grunt and Gulp, the two most popular, will be our focus because of their widespread adoption. There are many others, such as Broccoli, Middleman and Brunch, but this book’s principles apply to all build tools.
If your needs are simple, the package manager NPM can be used as a build tool - NPM along with Browserify can be quite a powerful combination. See http://blog.keithcirkel.co.uk/how-to-use-npm-as-a-build-tool/ for details.
The build file
The build file tells the build tool what to do. It defines a set of tasks that the build tool can perform. In Grunt, this file is called Gruntfile.js. In Gulp, it is called Gulpfile.js. As a rule, the build file goes at the root of the project, above the build and src directories.
| Item | OSX/Linux | Windows |
|---|---|---|
| Source dir | /home/user/myproject/src | C:\Users\user\myproject\src |
| Build dir | /home/user/myproject/build | C:\Users\user\myproject\build |
| Build file (Gulp) | /home/user/myproject/Gulpfile.js | C:\Users\user\myproject\Gulpfile.js |
| Build file (Grunt) | /home/user/myproject/Gruntfile.js | C:\Users\user\myproject\Gruntfile.js |
Tasks
Build tools run tasks. A task is simply an action or a set of actions that can be performed. For example, a task could be "copy files from src to build".
In most build tools, tasks are composable, meaning that a task can depend on or delegate to other tasks. For example, task copy-assets could depend on task clean, so that whenever copy-assets is run, clean is automatically run beforehand. The advantage of composability is that the code for the clean task won’t be repeated every time you need to call it.
Tasks are stored inside the build file; here is an example of a build file that contains some tasks:
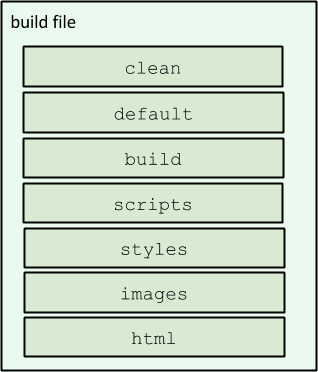
Anatomy of a task
A task generally has these attributes:
- Name
- The name of the task. Most tasks can be run in isolation by passing the task’s name to the tool on the command line. For example,
grunt cleanorgulp cleanwould run thecleantask. - Description
- Some build tools supply an optional task description, an explanation of the task that doubles as documentation for people on your team.
- Dependencies
- A list of tasks that must be run before a certain task can run. For example, the
buildtask may havecleanas a dependency, meaning that if you call thebuildtask, thecleantask automatically runs first. - Functionality
- This is the specific code or configuration that you write to implement your task. For example, the
scriptstask could minify and concatenate a set of files fromsrcand then copy them intobuild/js.
Creating your first build file
We will create a build file that automates the workflow that we have defined. I’m not going to write the actual code here, as it will differ based for each build tool, but I will represent it in an abstract manner.
These tasks will:
- Clean the
builddirectory - Compress and minify assets
- Copy the transformed results into the
builddirectory
Here is the order in which the tasks will run:
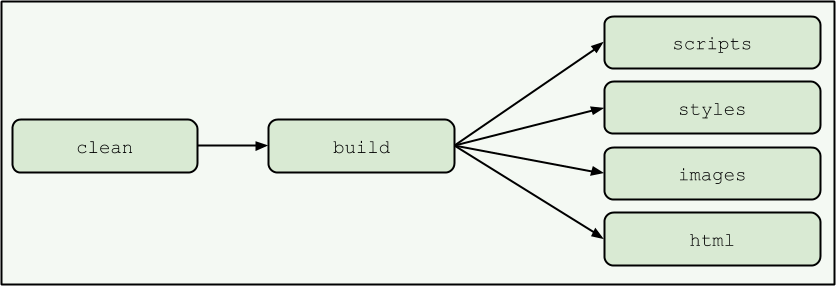
Some build tools can run tasks in parallel; others will run them one at a time in sequence. In the diagram above, we have assumed that we can run
scripts,styles,imagesandhtmlin parallel.
Explanation
Task clean - cleans out build directory
This simple task cleans out the build directory by deleting everything in it.
Task build - calls the subtasks
Depends on task clean via the dependency mechanism discussed earlier, so when build is called, it first triggers clean. After clean completes, the build task delegates to the scripts, styles, images and html tasks.
Task scripts - transforms javascript
Takes src/js/a.js and src/js/b.js, minifies them, then concatenates them into build/js/all.min.js.
Task styles - transforms CSS
Takes src/css/first.css and src/css/second.css, minifies them, then concatenates them into build/css/all.min.css. For designers writing in Sass or LESS, styles will also compile those files into CSS before minification and concatenation.
Task images - compresses images
Takes the images in src/img, compresses them, and outputs them to build/img.
Task html - transforms HTML
Takes src/index.html and minifies it. It then modifies the HTML, directing the asset paths to build, not src. The output is then directed to build/index.html.
Once the build task completes, you have your complete website, ready for use in the build directory.
Plugins
For each task, there is an installable plugin for your build tool. This is great because it means you usually have to write very little code.
The Gulp team maintains a list of verified plugins and their community ensures that there is only one plugin for each task. In contrast, the Grunt community often offers a number of alternatives for each plugin. The grunt-contrib-* plugins are the best starting point because they are officially maintained.
The specifics of how to install and use these plugins are beyond the scope of this book.
| Task | Gulp plugin | Grunt plugin |
|---|---|---|
| clean | del | grunt-contrib-clean |
| scripts | gulp-uglify | grunt-contrib-uglify |
| styles | gulp-minify-css | grunt-contrib-cssmin |
| images | gulp-imagemin | grunt-contrib-imagemin |
| html | gulp-minify-html | grunt-contrib-htmlmin |
Look over the sample project for this book at https://github.com/gavD/5ss-build-tools. There, you will find example build files for Grunt and Gulp that follow this approach.
Automating your workflow
At this point, the areas in green are automated:

Design and editing source code in src isn’t automatable - if it were, robots would be doing our jobs. Therefore, we will omit these workflow stages from the future diagrams. The rest of these tasks, however, we can use build tools for.
Task watch - automating your automation
Right now, you are probably running the tool on the command line every time you make a change. This is pretty laborious, and also error prone - chances are you will make a change, forget to run the tool, reload the browser, and be confused as to why your changes aren’t showing up… I know I’ve certainly done that!
Thankfully, we can automate this. We will create a new task, watch, which will monitor the src directory, and whenever anything changes in there, it automatically runs the default task, which has the build task as a dependency:

Now, the build tool runs automatically when anything changes in src, so that any time you update your source code, the website is regenerated automatically. This automates the build:

Task serve - run a local server
Instead of constantly pushing code up to a web server, build tools allow you to run a server locally, which serves the build directory, so you’re seeing the compressed, minified, concatenated versions of files, just like your users will. This means that we can remove the "Push to server" stage of the workflow entirely:

Don’t worry if you were hoping to cover deployment in your build workflow; we will talk about deployment later.
Task refresh-browser: refresh your browser
One task that we spend a lot of time doing is making changes, then going over to a browser and reloading the page. A LiveReload will ensure that when a build occurs in response to a change to src, not only is the build task called, but also the browser is automatically reloaded:

We’ve now automated a huge amount of the workflow:

What do we use to write these tasks?
| Task | Gulp plugin | Grunt plugin |
|---|---|---|
watch | gulp-watch | grunt-contrib-watch |
serve | gulp-connect | grunt-contrib-connect |
refresh-browser | gulp-livereload | grunt-contrib-watch (built in) |
Finished build file
We end up with a set of tasks that we can run. Here are the "top level" tasks, i.e., the ones that we will commonly call from the command line:
| Task | Dependencies | Description |
|---|---|---|
default | build | Default task so that when your build tool is called with no parameters, it simply delegates to the build task. |
build | clean, scripts, styles, images, html | Minifies, concatenates, and compresses assets, then moves the compressed versions into the build directory. |
watch | live-reload, serve | Launches the local server, which serves the build directory. Watches the src directory. Any change to any file inside src will trigger the default task. This is the task you will run when you are working on your project, and it will whirr away in the background keeping everything up to date for you. |
What else can build tools do for us?
We’ve automated the workflow that we defined earlier, but build tools can do lots more. Here are a few examples.
Linting
Linting, also known as static analysis, is the automated inspection of your source code (files in src). Think of it as having a more experienced colleague checking your work and making sure that you haven’t made any common mistakes.
JavaScript can be automatically checked using a tool called jshint. This can check for common performance, security, and stylistic problems. Following the recommendations of jshint makes your code standards-compliant, and protects you from common clangers.
Similarly, CSS can be linted using tools like csslint. This can help you to automatically detect whether you’ve used invalid or deprecated rules. It can also help you to make more efficient CSS that the browser can use without friction.
HTML can also be linted!
I generally recommend obeying every recommendation that linters make - as legendary programmer John Carmack once put it, "If you have to explain it to the computer, you’ll probably have to explain it to your colleagues."
All linters can be "tuned" to your specific needs - for example, if you are breaking one rule for a good reason, then you can tell your linter to ignore it.
Here are some example tools you could use:
| Functionality | Gulp plugin | Grunt plugin |
|---|---|---|
| Lint css | gulp-csslint | grunt-contrib-csslint |
| Lint javascript | gulp-jshint | grunt-contrib-jshint |
| Verify html | gulp-htmlhint | grunt-htmlhint |
CSS preprocessing
CSS is great but it’s fiddly. A preprocessor makes CSS far easier to work with. I use LESS day-to-day, but there are many others, including Sass and Stylus. All preprocessors add features like variables, mixins, and so forth, which greatly reduce the amount of code you need to write and make it far easier to maintain.
Using a preprocessor, the styles task can transform styles into raw CSS. This means that you would never need to edit raw CSS; you could work entirely in the far more pleasant world of LESS (or whichever you prefer).
| Functionality | Gulp plugin | Grunt plugin |
|---|---|---|
| LESS to CSS | gulp-less | grunt-contrib-less |
Script preprocessing (transpiling)
Instead of plain JavaScript, you might be using something like CoffeeScript. You would need a transpiling stage, which converts from CoffeeScript into JavaScript.
You might also be using a more cutting-edge version of JavaScript than is available in current web browsers. At the time of writing, ES6 is a forthcoming version of JavaScript that is not available for general usage in many web browsers. Therefore, we can use tools to transpile it into ES5.
Once you have these tools in your workflow, you would have your CoffeeScript or ES6 code in src, and standard ES5 code in build. It makes debugging a little more difficult, but it can be worth it if you want to use cutting edge features.
| Functionality | Gulp plugin | Grunt plugin |
|---|---|---|
| CoffeeScript transpiler | gulp-coffee | grunt-contrib-coffee |
| ES6 transpiler | gulp-babel | grunt-babel |
Push to server
Build tools can even be used for deployment. There are all sorts of options here and it is out of our scope to cover them in detail, so here are a few examples:
| Functionality | Gulp plugin | Grunt plugin |
|---|---|---|
| FTP | gulp-ftp | grunt-ftp-deploy |
| Github pages | gulp-git-pages | grunt-gh-pages |
| rsync | gulp-rsync | grunt-rsync |
Best practice
Generally, you can use a build tool for any automation task. As with any software, build tools are open to misuse, however, so here are some guidelines to help you to make sure you are using the build tool as it was intended.
Never edit anything in the build directory
You should never manually edit anything in the build directory. Similarly, your build tool should never modify anything in the src directory.
If there is anything that you have to do in the build directory, you can almost certainly find a way to get the tool to do it for you.
Never let your build tool modify anything in the src directory
Conversely, if your build tool modifies your src directory, you are going to have a bad time. Such behaviour breaks the "pipeline" approach and can create circular actions that never fully resolve. Therefore, you need to be confident that your build tool will stay out of the src directory entirely.
Think of it like this: src is yours, build belongs to your build tool.
Short, sharp, composable tasks
Whilst you CAN create tasks that are huge and have a large amount of code, it is usually better to separate these into smaller tasks and compose them using task dependencies.
Your normal workflow should be encapsulated by a single task
You shouldn’t need to be constantly running a bunch of separate tasks. Instead, one task should rely upon or kick off the subtasks that it needs. Generally, you should use some kind of watch and run it in the background. As you do your normal work, it will detect changes, and then run everything it needs to.
If you’re finding yourself constantly having to stop your watch task and run things, then consider putting them into your main (default) task.
Have tasks that aren’t part of your main workflow as separate tasks
Conversely, for tasks that aren’t part of your regular workflow, don’t have the main workflow call them.
For example, you don’t want to deploy every tiny little tinker you make in your local workspace. Therefore, you might have a task like deploy that you only call once you’ve done all of your testing and you’re confident that it’s time to go live.
Don’t store credentials in plain text
Speaking of deployments, it might be tempting to store things like passwords or authentication tokens in your build file. This is generally a bad move from a security perspective - if someone accesses your build file, they could compromise your live systems.
A full treatment of security issues is outside of the scope of this book, but suffice to say, don’t store credentials in plain text and certainly don’t keep them directly in your build file.
Debugging with source maps
If you have "compiled" (minified, concatenated) JavaScript code in build, it will look different to your code in src. It will have had whitespace removed, variable names shortened - all sorts of changes that make it hard to debug. You can use a source map to help you here. A source map holds information about your original source files. Browsers like Chrome and Firefox support source maps, and enable you to debug as if you were using your original code. This is really handy as it means you are testing the same code the user would receive, but debugging it in its original form.
Similarly, with a CSS preprocessor like LESS or SaSS, the CSS in build is different to the CSS in src. LESS and SaSS support source maps as well, so you can use the same approach.
Being idiomatic
Try to ensure that your project is idiomatic. By that, I mean that you should follow the conventions that other people use for similar projects. This has the following benefits:
- Easier to apply code snippets you find online
- Easier to explain to people than some bespoke system
- The wheel remains un-reinvented!
There are a couple of ways you could go about this. Firstly, you could clone an existing repository and modify it to suit your needs. Feel free to clone the sample source code for this book from https://github.com/gavD/5ss-build-tools.
The second option is to use a scaffolding tool. These are tools that create a "skeleton" project for your app that has the tools you will need installed and ready to use. So, you don’t have to create the build and src directories, and you don’t have to create your build file - your scaffolding tool does it all for you. Handy!
If you’re starting with a brand-new app, Yeoman is a great scaffolding tool that uses generators to get you up and running with a project structure. It supports a huge range of project types. For example, are you building an AngularJS app? Then use the yeoman angular generator! Working on a PhoneGap project? Then use the yeoman phonegap generator! No matter what you are building, there is likely to be a Yeoman generator that can help you to get started.
See also: Browserify
Check out Browserify. It’s not a build tool as such, but it offers a nice minimalist approach to the JavaScript asset pipeline.
Go forth and build!
In this book, we started out by looking at common web development workflows. We then went on to look at how we can improve upon that workflow. We then took a detailed look at what a build tool is, what a build file is, and what tasks are. We then went through creating some tasks to automate the workflow.
Thanks for reading, I hope that this book has been a useful introduction to the wonderful world of build tools!
Further reading
- James Cryer’s Pro Grunt.js
- Travis Maynard’s Getting Started with Gulp
Thanks
Many thanks to the following proof readers for valuable insights and corrections:
- Nate Abele
- Andrew Canham
- Kathryn Davies
- Aryella Lacerda
- John Mercer
Download as PDF
Use the button below to get the book in its original form.