AngularJS’s ngModel.NgModelController is extremely powerful, but it can seem a bit daunting, what with its $formatters and $render function and $parsers... How do we get our heads around it?
This article assumes you’ve got a little bit of experience with AngularJS. You don’t have to be a brain scientist or a rocket surgeon or anything, so long as you’ve used it a little!
I developed this article from the notes I wrote as I was learning NgModelController - I found the learning curve a little steep so hopefully this can help somebody else hit the ground running!
What is ng-model?
ng-model is what Angular uses to two-way data bind values to controls, e.g.
<label>Username
<input ng-model="use.name">
</label>
What if you want to display a custom control for a complex value, though? What if you wanted multiple fields to represent a single value? That’s where NgModelController comes in!
What is NgModelController?
NgModelController is the same thing that Angular uses to bind ng-model to input boxes and menus and so forth and it has a lot of functionality that you can hook into and take advantage of.
What is NgModelController for?
NgModelController has the following advantages:
- Allows you to set up validation on the ng-model
- Ability to transform the underlying model to and from a view value that can be used to have a sophisticated interface
- Supports transformation of the underlying value into a format that can be displayed differently, and transformation back to the underlying model
- Allows you to monitor when the value has changed and whether it’s clean or dirty
- Neat encapsulation - make the directive self contained
You would use NgModelController when:
- You’ve got something you want to bind to ng-model and you need a sophisticated interface to it.
- You want to render a value differently in the UI to how it is represented in the underlying model. For example, a calendar control.
- You have specific validation you want to apply. For example, validating that a dateis within a certain range.
The values and life cycle
To allow the conversion of a piece of data into a format it can be manipulated in, and back again, NgModelController works by adding a $modelValue and a $viewValue as well as scope values local to the directive. This means that you have:
- The actual, real value.
- NgModelController.
$modelValue- the internal value that gets synchronised with the ACTUAL value that’s linked byng-model. - NgModelController.
$viewValue- the value that$modelValuegets translated to. - scope values - used to bind things in your directive to. Usually a copy of NgModelController.
$viewValue.
Here are where the values exist:
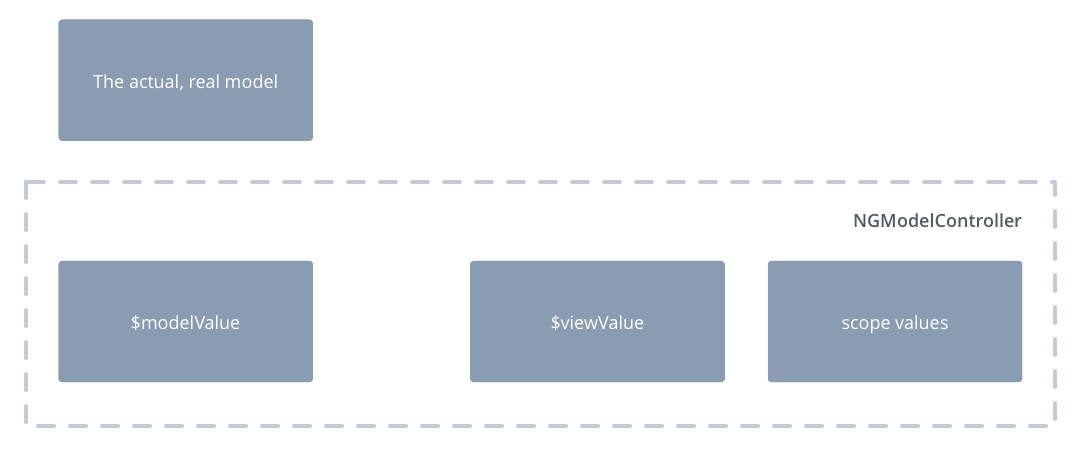
NGModelController handles synchronising them through the following process:
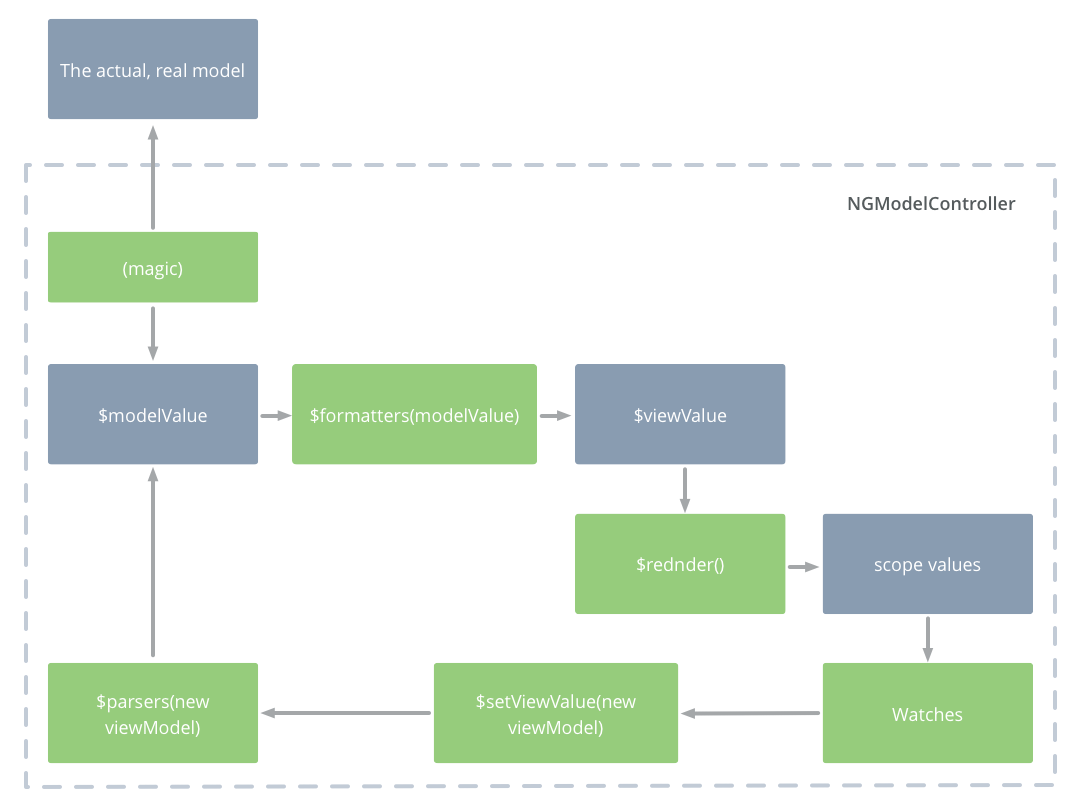
Yikes! This looks a bit complicated but we are going to go through a worked example bit-by-bit to show how it all works. At some point it will “click” and you will harness the power for yourself!
Example - a colour picker
I’ve made an example colour picker - it’s not amazing but it should illustrate the principles! It allows you to select None, Some or Lots of Red, Green and Blue channels respectively. Under the hood, that’s a single value (e.g. “#FA0”), but in the interface it is three select boxes:
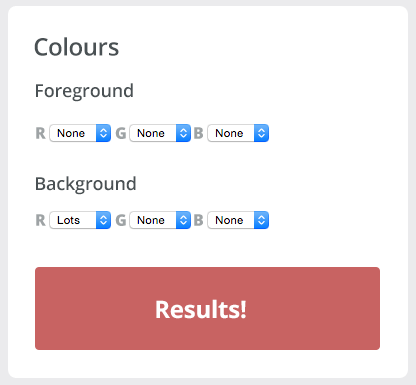
You can play with the code yourself here: http://jsfiddle.net/cox0sba1/
We have two instances of our colour-picker custom directive and we use ngModelController to convert between the three channel values that the user sees (R, G, B) and the single underlying string that represents the value that ng-model is bound to.
The app namespace
We define an Angular module called “RadifyExample”:
angular.module('RadifyExample', [])
The controller
All the controller does is set up background and foreground colour values:
.controller('ColourPickerController', function($scope) {
    $scope.background = 'F00';
    $scope.foreground = '000';
})
The HTML bit
<div ng-app="RadifyExample" ng-controller="ColourPickerController">
    <h1>Colours</h1>
    <label>
        Foreground
        <colour-picker ng-model="foreground"></colour-picker>
    </label>
    <label>
        Background
        <colour-picker ng-model="background"></colour-picker>
    </label>

    <div style="background: #{{ background }}; color: #{{foreground}};" class="results">
        Results
    </div>
</div>
The two values - foreground and background - from the controller are bound by ng-model to a custom directive colour-picker. This gives us two colour pickers.
We then have a little area “Results” that simply renders the background and foreground in a div with the word “Results” so we can see what colours the user has selected.
The directive
First up is a simple template that shows three <select> controls.
.directive('colourPicker', function() {
  var tpl = "<div> \
     R <select ng-model='red'> \
         <option value='F'>Lots</option> \
         <option value='A'>Some</option> \
         <option value='0'>None</option> \
     </select> \
     G <select ng-model='green'> \
         <option value='F'>Lots</option> \
         <option value='A'>Some</option> \
         <option value='0'>None</option> \
     </select> \
     B <select ng-model='blue'> \
         <option value='F'>Lots</option> \
         <option value='A'>Some</option> \
         <option value='0'>None</option> \
     </select> \
 </div>";
We then have some initialisation - we restrict to ‘E’ for element, assign the template and create an isolate scope. The next bit is where we require 'ngModel', which gives us all the NgModelController functionality.
  return {
      restrict: 'E',
      template: tpl,
      scope: {},
      require: 'ngModel',
Now we have the real meat of the code - the link function with its injected NgModelController instance ngModelCtrl:
link: function(scope, iElement, iAttrs, ngModelCtrl) {
Inside the link function, we do a bunch of things. Firstly, we set up formatters (which convert the model value to view values):
Set up formatters
          ngModelCtrl.$formatters.push(function(modelValue) {
              var colours = modelValue.split('');
              return {
                  red: colours[0],
                  green: colours[1],
                  blue: colours[2]
              };
          });
Formatters can be a whole chain of functions. We are using just one. All we do is take the $modelValue - which is the underlying “actual” value within NGModelController and is a 3 character string - and split it so we have an array of 3 elements [red, green, blue]. We return these as an object, and they get set on the view value.
Set up render function
          ngModelCtrl.$render = function() {
              scope.red   = ngModelCtrl.$viewValue.red;
              scope.green = ngModelCtrl.$viewValue.green;
              scope.blue  = ngModelCtrl.$viewValue.blue;
          };
The $render function takes the values that are on the $viewValue of ngModelCtrl and puts them onto the local scope. In other words, it takes the $viewValue and renders it to the screen. This means that in the directive’s UI we have access to red, green and blue.
All we are doing here is taking the view value and putting it on the scope variables for access in the HTML template.
Set up a watch
          scope.$watch('red + green + blue', function() {
              ngModelCtrl.$setViewValue({
                  red: scope.red,
                  green: scope.green,
                  blue: scope.blue
              });
          });
We are telling the scope to pay attention to the three variables that we have put onto it - red, green and blue. When one of them changes, Angular, in its next digest cycle, will set the view value on the ng model controller, keeping the interface up to date and everything in sync.
Set up parsers (convert view value to model value)
          ngModelCtrl.$parsers.push(function(viewValue) {
              return '#' + [viewValue.red, viewValue.green, viewValue.blue].join('');
          });
Just like formatters, you can have multiple parsers, and again we’re just using one. All it does is join together the $viewValue’s [red, green, blue] array back into a 3 character string.
Step by step - what is happening in the colour picker?
Let’s take a look at what is actually going on when we use our colour-picker directive.
When you change one of the <select> field inputs…
So, when you change any of the <select> field values, that changes the scope value. Standard angular! This then kicks off a few things:
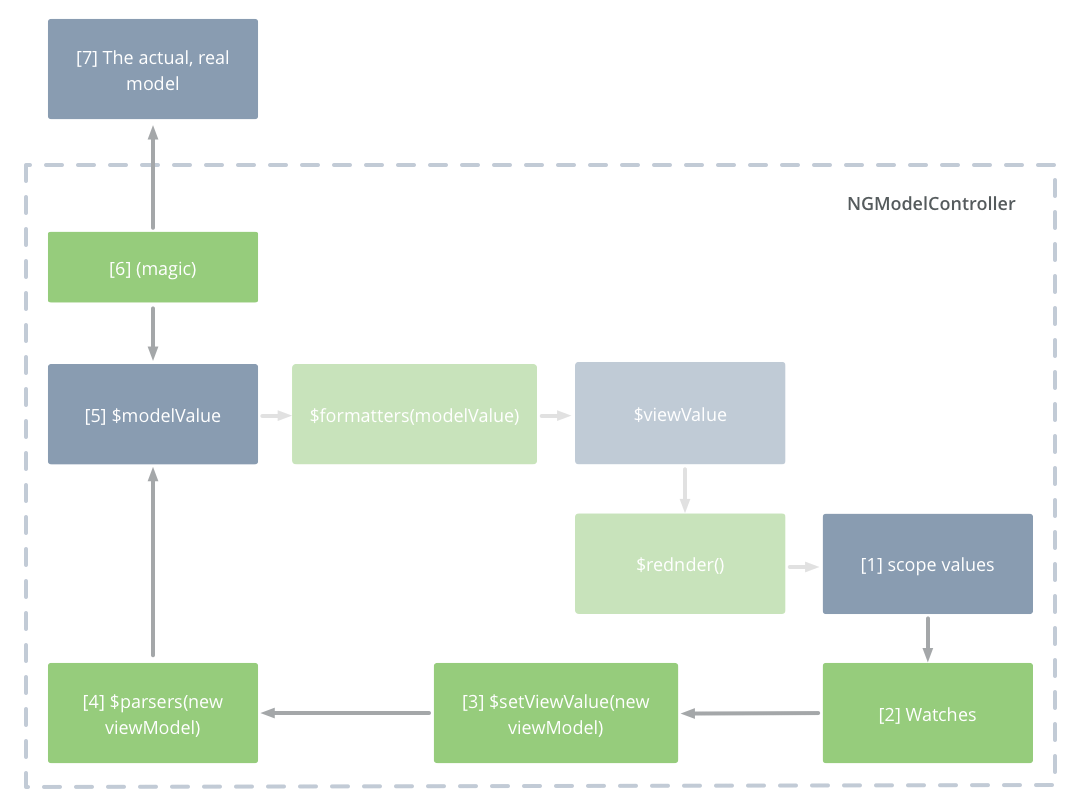
- The scope value has been changed
- The watch function picks up that something has changed on the scope value
- Watch calls
$setViewValue, which sets the$viewValue - Change to
$viewValuesets kicks off the parser chain$parsers - Parser chain updates the underlying
$modelValue - Some kind of Angular magic happens!
- The real model is updated. Everything in synchronised!
If something changes the underlying value...
So what happens if something outside of the directive changes the real value? A chain of events is kicked off which synchronises everything:
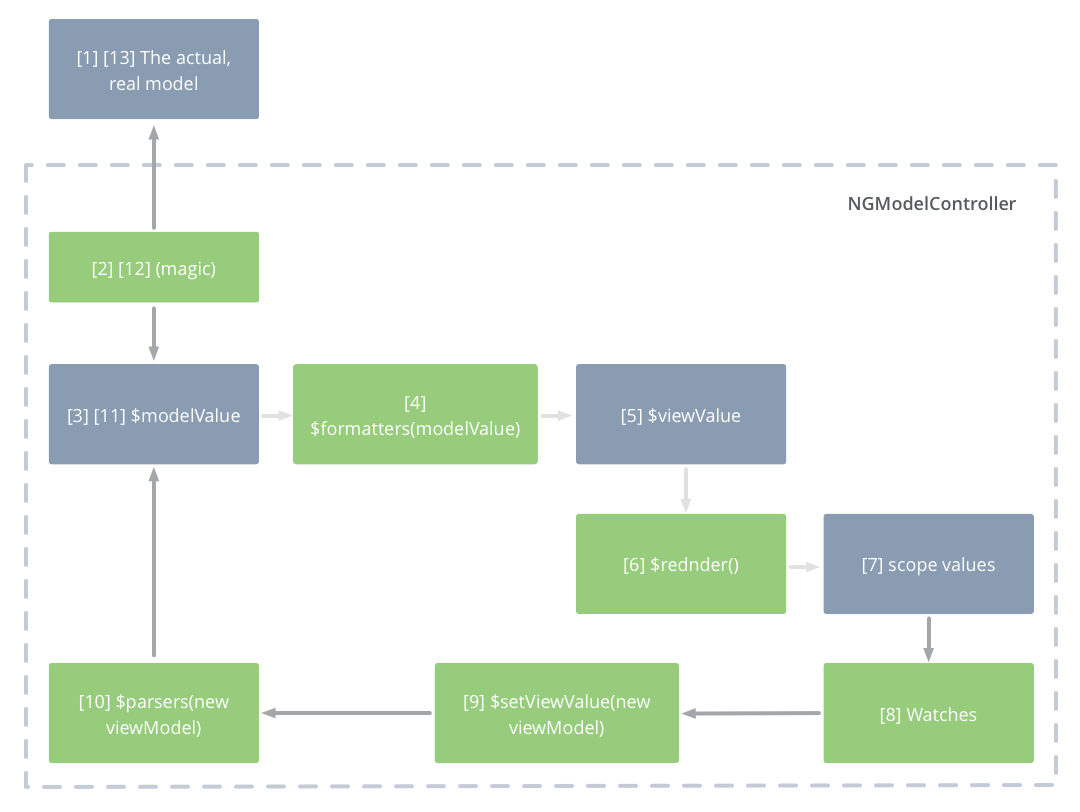
- The real model is changed outside of
NGModelController - Angular says "hey
NGModelController! The model has updated!" NGModelControllerupdates$modelValue- The
$formatterschain is be triggered, and converts the$modelValueto the$viewValue - The
$viewValuehas been updated by$formatters - Because the
$viewValuehas been updated, the$renderfunction gets kicked off - The
$renderfunction updates the scope values - The
watchfunction picks up that something has changed on the scope value - Watch calls
$setViewValue, which sets the$viewValue - Change to
$viewValuesets kicks off the parser chain$parsers - Parser chain updates the underlying
$modelValue - Some kind of Angular magic happens!
- The real model is updated. Everything in synchronised!
You can observe this by adding <input ng-model="background”> and changing the value in there and you can see that formatters is kicked off.
More on the topic
There is more to NGModelController. In the next article in this series, we look at validation!
Further reading
- http://www.chroder.com/2014/02/01/using-ngmodelcontroller-with-custom-directives/ - probably the most easy-to-follow article, although there are a few misleading typos to watch out for that had me scratching my head!
- https://docs.angularjs.org/api/ng/type/ngModel.NgModelController - the official docs
Wrapping up
We hope that this article has helped you to get your head around ngModelController! Please let us know if there are any inaccuracies in this article, or how we could make it better!